Bearings often fail due to contact with water, which provokes corrosion. Water falls on the part of the gland wear. This part is 5-7 лет и требует замены по истечению данного срока. 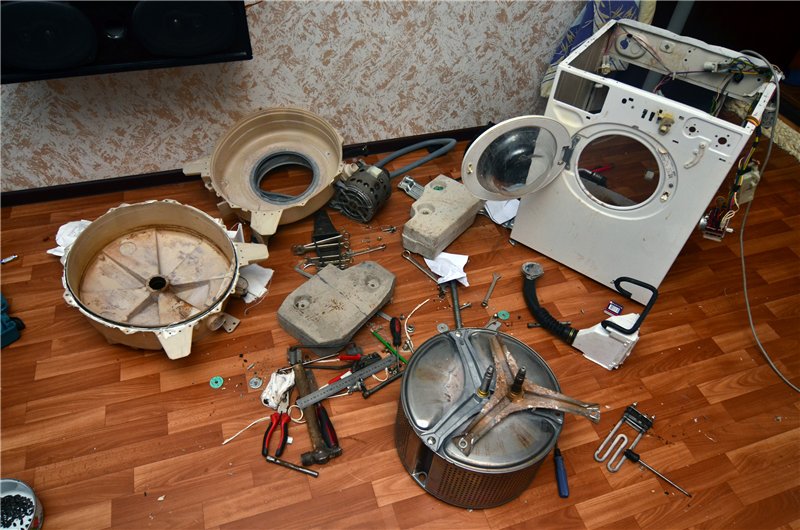
Change the oil seal and the bearing can be self, but you need to understand, this laborious procedure requires skillful hands and take a whole day at the beginner. In case of doubt in their own abilities better to entrust the replacement of accessories repairman.
Required tools
What do I need to replace parts? New bearings and seals, the corresponding modifications to the washing machine, sealant, adhesive tape, several cuts tissue. And other instruments:

- carob keys from 12 to 19 size;
- similar wrenches;
- hexagons set;
- a normal hammer;
- rubber mallet;
- and various flat Phillips screwdriver;
- adjustable wrench;
- water resistant grease;
- chisel blunt.
Each model and brand have their own characteristics, in Kherson there are specialists in repair of each.
Preparing the washing machine
Before starting any repair work necessary to prepare parts, instruments, install the machine in a convenient location for repair. To avoid confusion during assembly, Prepare a camera or smartphone compounds for fixing the position in the device.
The first step is carried out the dismantling of the upper body cover, which is fixed with 2 rear cogs. Further, the dispenser is extracted and removed front control panel, held in place by screws. Next door is removed the clamp sleeve, free part of the cuff should be sent into the machine. After that removed the hatch lock, Lockable 2 screws. unscrewing them, a blocking system to be separated from the rear wall. Further dismounted front and rear housing cover.
After disconnecting the dispenser from the tank to the nozzle is removed counterbalance device, bolted. TEN should be removed. And before dismantling necessarily take a picture of the connected wires. The first attachment is removed the heating element - usually with a screw nut. When the attachment is removed, PETN readily retrieved using a flathead screwdriver. Next, the clamp is removed and the pipe removed, attached to the drum. Disconnected motor connection wires.
The next stage is conducted from the rear side machine. There is removed the drive belt, switched off the motor wires and unscrew its mounting. The engine can be removed, pulling the. Further removed shock absorbers: initially be turned out fixing screws, and then removed the spring. After that, the machine tank is available for extraction.
parsing tank
 To replace the bearings it is necessary to disassemble the tank, dividing it into 2 half and taking out the drum. Half often fasten latches or bolts. After removing the clamps around the perimeter of the tank can remove the front part and clean it from dirt.
Next, you will need to dismantle the drum, attached to the rear of the tank. Remove the bolt, removed from the pulley axis, and bolt back into place and twisted until it stops, to prevent damage to the drum shaft removing.
Using conventional hammer gently knock shaft, until it is flush with the cap screws, then the bolt is removed, and the drum is removed from the tank. Check out, Whether the sleeve and the shaft is not worn out, wiping them with a cloth. Make sure, after installing new bearings on the shaft does not appear backlash, in this case required the replacement of the cross and the shaft. Inspect and sleeve, which is attached to the caul, if there are no signs of wear and lateral grooves - it still will.
bearing replacement
Before you remove the old parts, you need to remove the gland, prying the flat screwdriver and separated from the rear wall. After that, access to open bearings. To extract the metal parts should be carefully knock out their: small inside, and a large outside.
With a hammer and metal rod sharp movements knock out item, moving the point of impact crosswise. In turn, remove both bearings from the tank. Back cover and a place for the new parts should be thoroughly cleaned of dirt.
First install a small bearing, similar movements scoring until it stops. About the correct details planting will say more sonorous sound when struck. In a similar way, but with the reverse side of the tank, install a large bearing. After that, a good rub with the oil seal with grease and set it into place.
Precautionary measures
Before the start of repair disconnect the device from the network, disconnect the water supply hose, Drain the water from the filter. Install the car there, where the smallest details are not available for children and animals. Capture device as dismantling for correct assembly and operation. Remember, that the safety of the further operation of the device able to ensure only professionals.
_


